
🚧
This tutorial is not yet updated for Chartbrew v3. You can still follow this tutorial, but check the newly updated list of environment variables needed for the app to run
.
Otherwise, have a look at
how you can deploy Chartbrew v3 with Render
.
Chartbrew is an open-source platform that uses NodeJS and ExpressJS in the backend, and ReactJS for the frontend application. In this tutorial, we are going to use Heroku to host the backend and Vercel to run the frontend application.
Choosing a name for the app
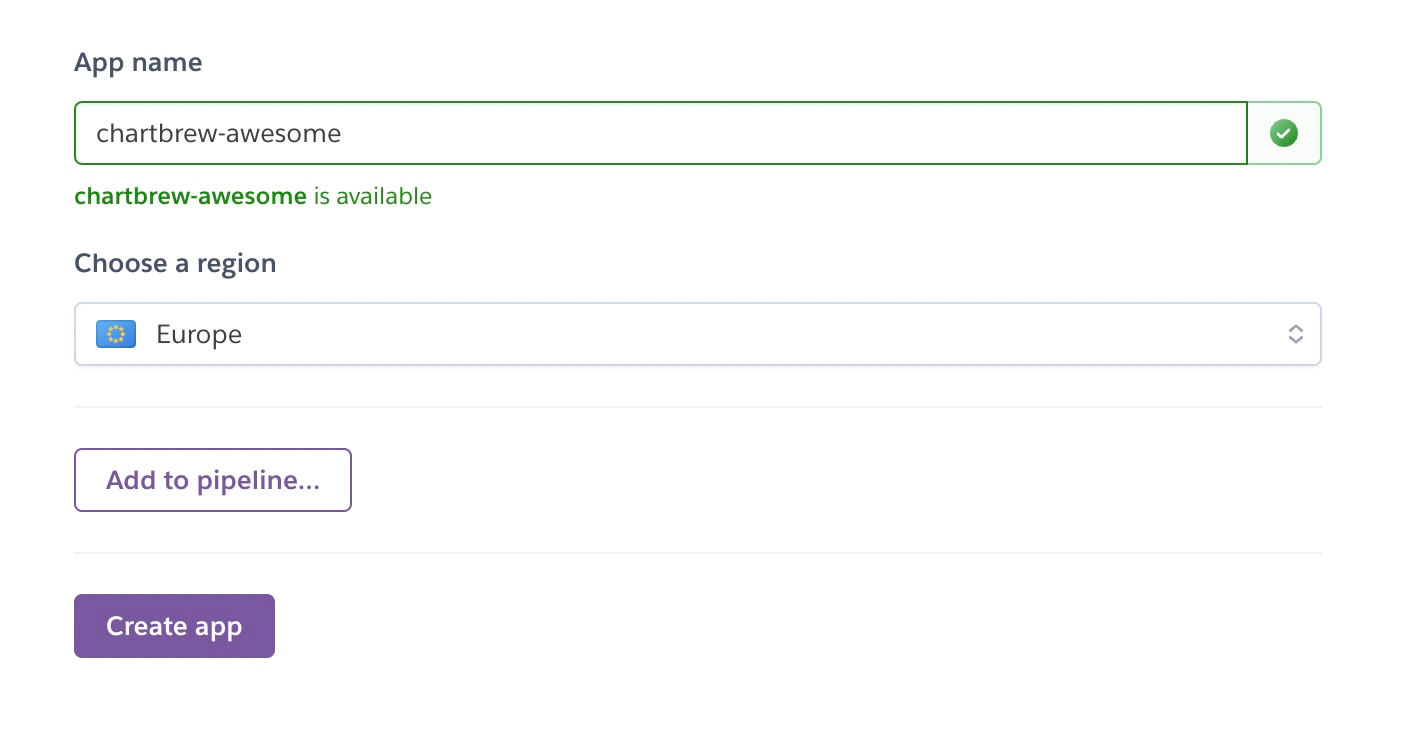
The tutorial is going to use chartbrew-awesome as the name of the project. You will have to use your own unique name for the application. To choose the right name, we are going to create an app with Heroku because it will tell us if the name is available or not. Log in with Heroku and click here to create a new app.
🙋
You will have to replace "
chartbrew-awesome" with the name you choose throughout this entire tutorial
Preparing the project locally
The next step will involve getting a copy of Chartbrew on your machine. This will enable you to deploy the application on Heroku and send further updates to both the backend and frontend applications.
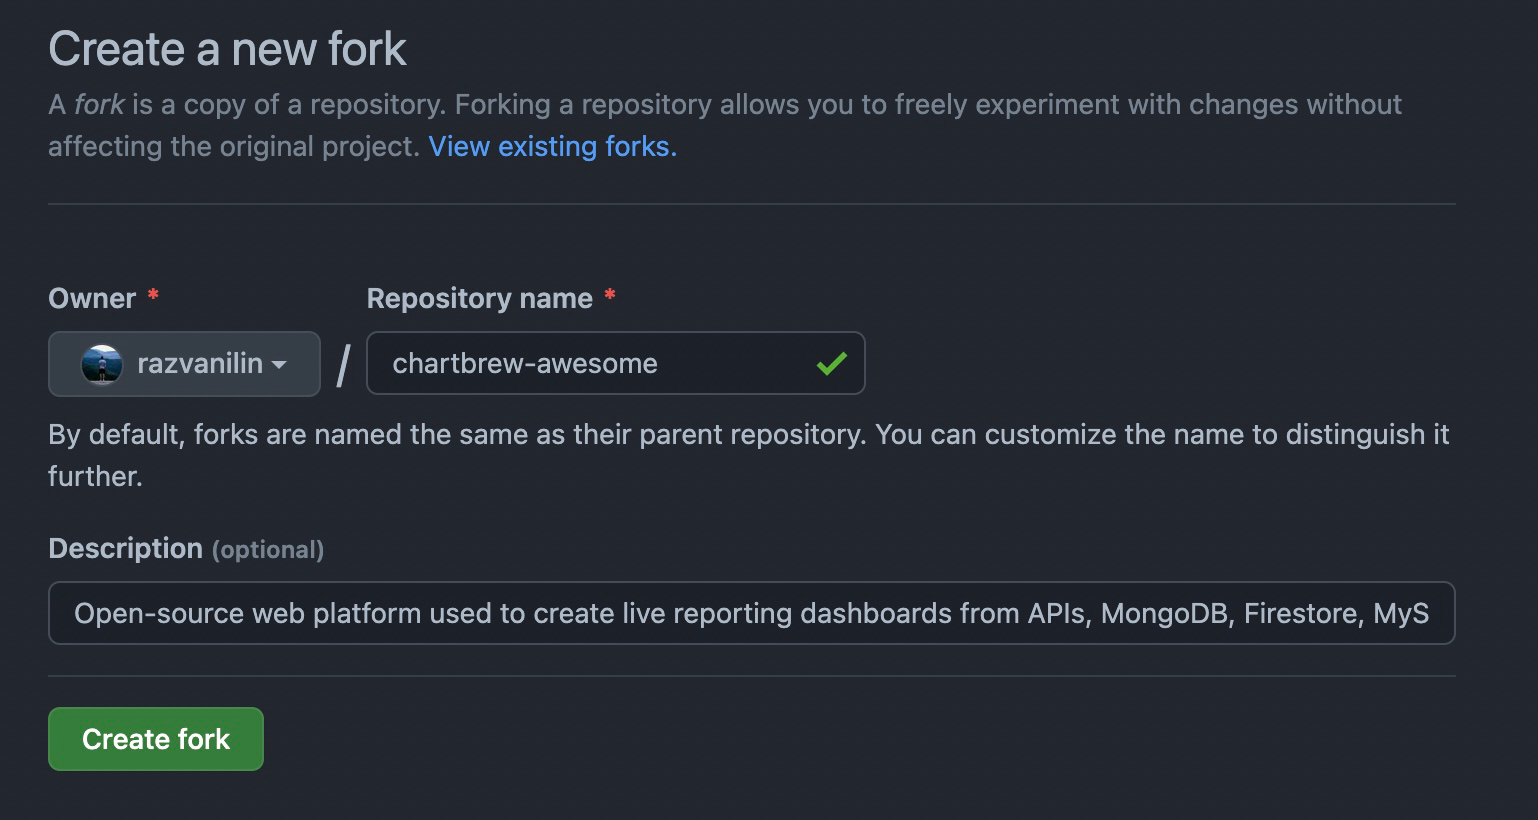
Click here to fork Chartbrew into your own GitHub account. This repository will be used to keep track of your project instance and to manage automatic deploys to Vercel. You can leave the name of the fork as chartbrew, or name it the same as the app name chosen above.
Now that we have the fork, you will have to clone it on your machine. To do this, navigate to the folder of your choice and run the following command:
git clone [email protected]:razvanilin/chartbrew-awesome.git

# replace the code with your repository HTTPS or SSH link
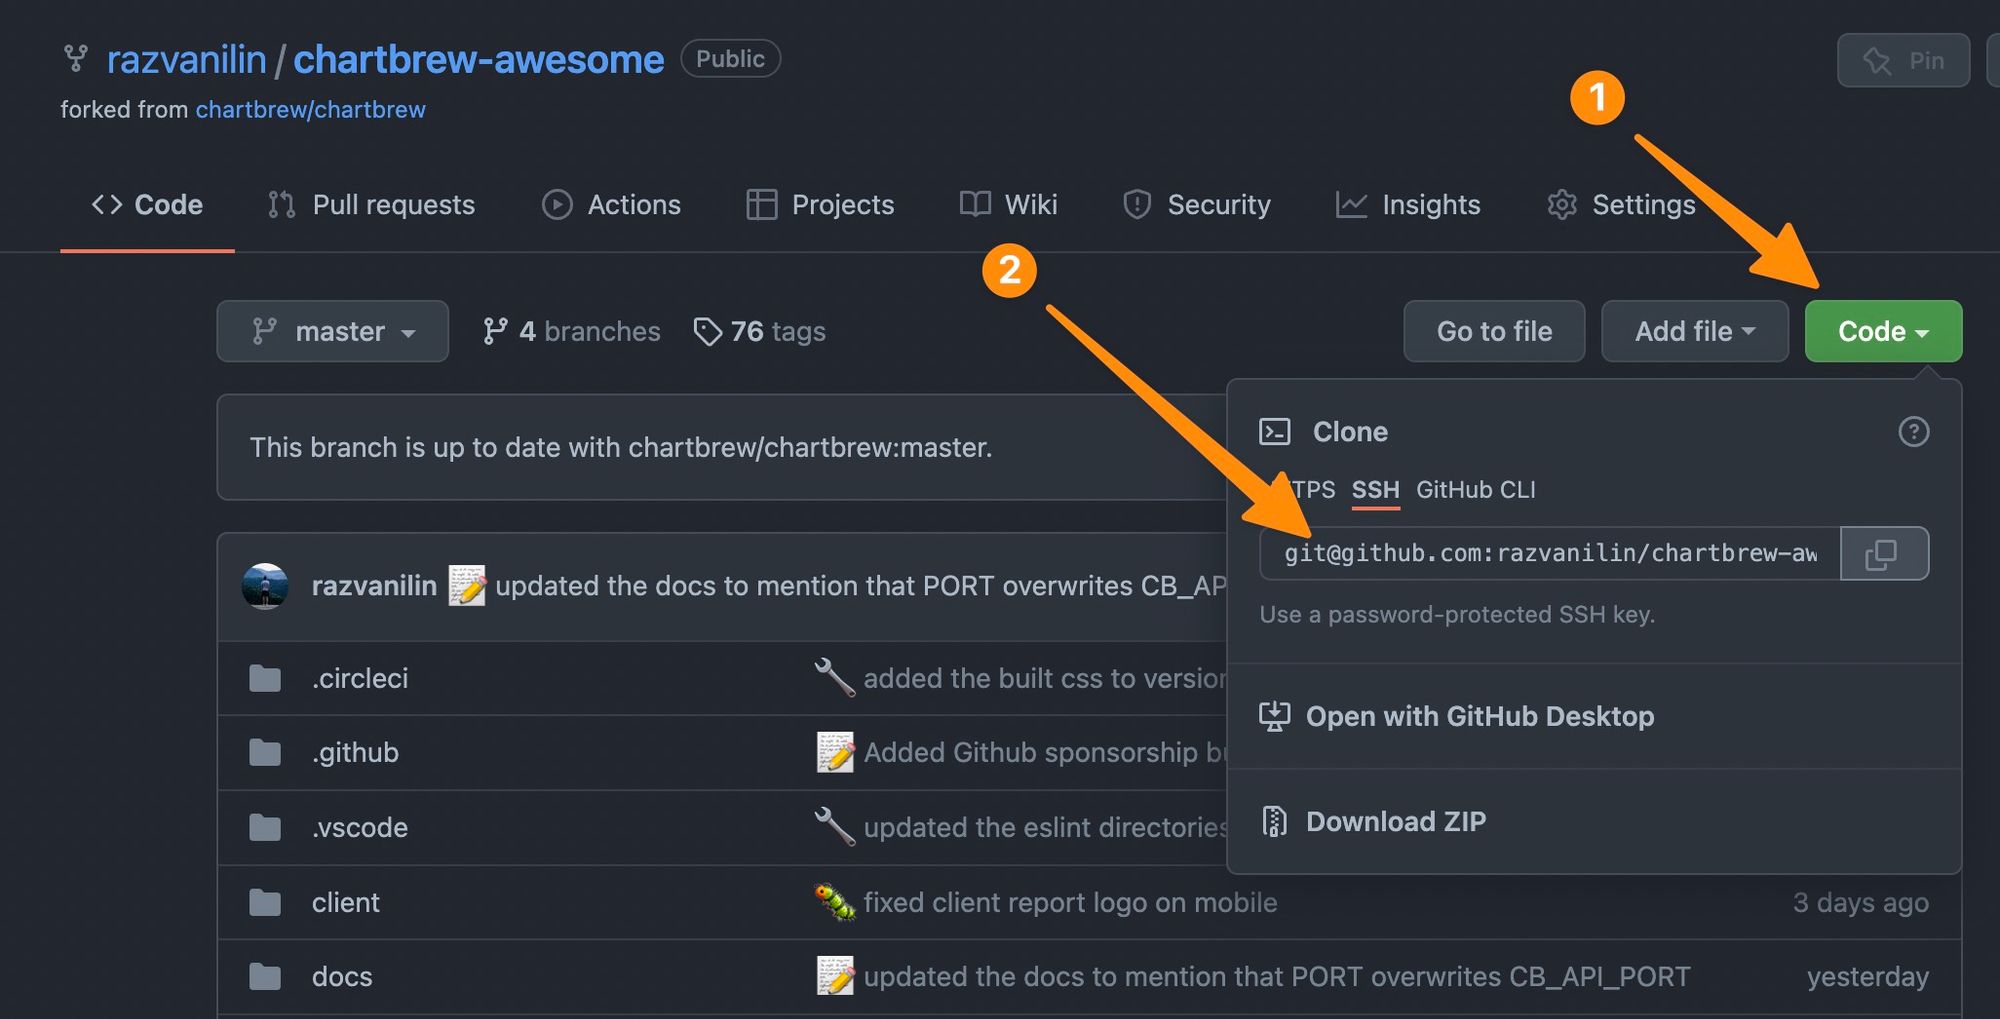
Modify the command above with the link you get from your fork
Congrats! Now you have a copy of Chartbrew on your machine!
Setting up the backend on Heroku
Next up, we are going to get the backend up and running on Heroku. Navigate to the folder where you cloned Chartbrew and run the following commands:
ℹ️
Remember to replace
chartbrew-awesomewith the name you chose at the start
ℹ️
If you don't have Heroku CLI,
.
# navigate to the Chartbrew clone's root directory
cd chartbrew-awesome

# login on Heroku's CLI tool (check below how to install it)
heroku login

# configure the Heroku remote
heroku git:remote -a chartbrew-awesome

# create a new database for Chartbrew
heroku addons:create jawsdb:kitefin -a chartbrew-awesome --version=5.7
Configuring the Heroku variables
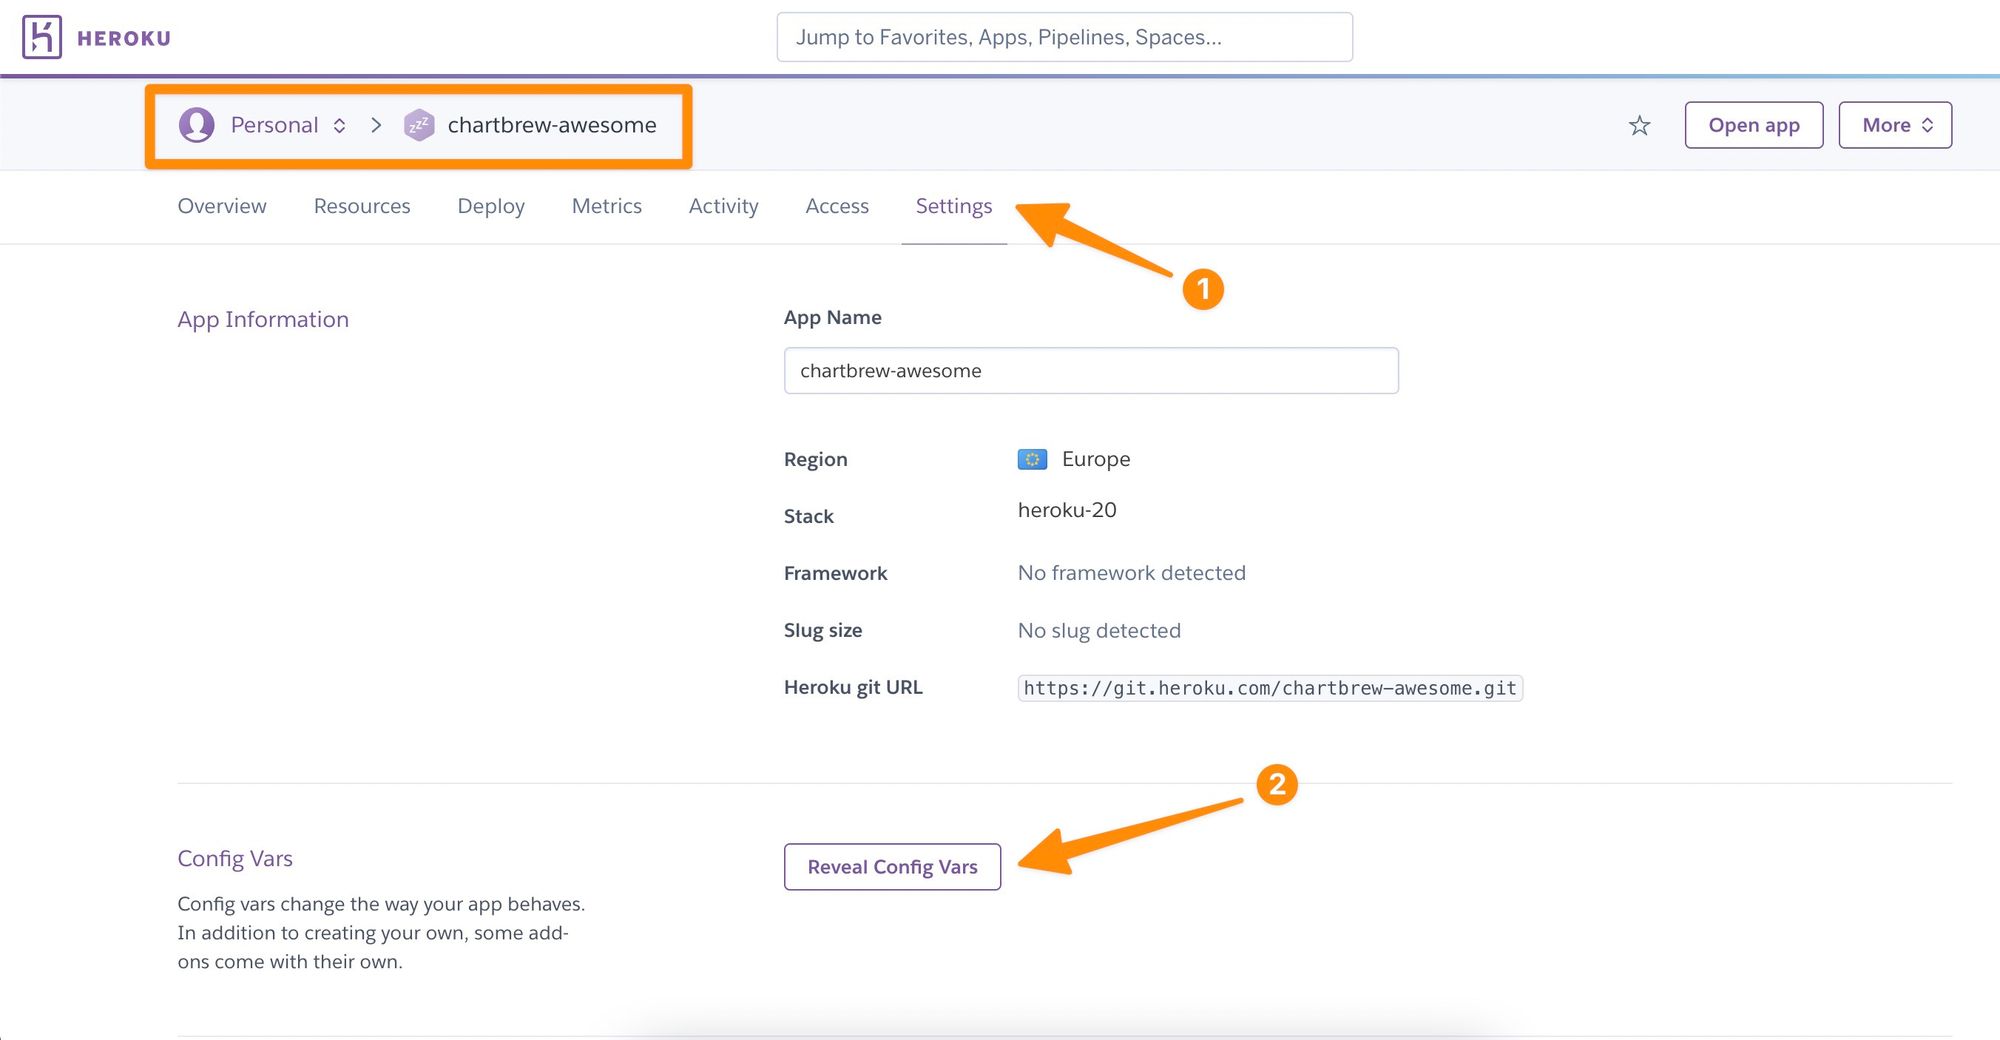
Before we push the application to Heroku, let's set up the necessary environment variables so that Chartbrew's backend can run properly. Head over to the Heroku app we created in the beginning, click on settings, and then reveal the config vars.
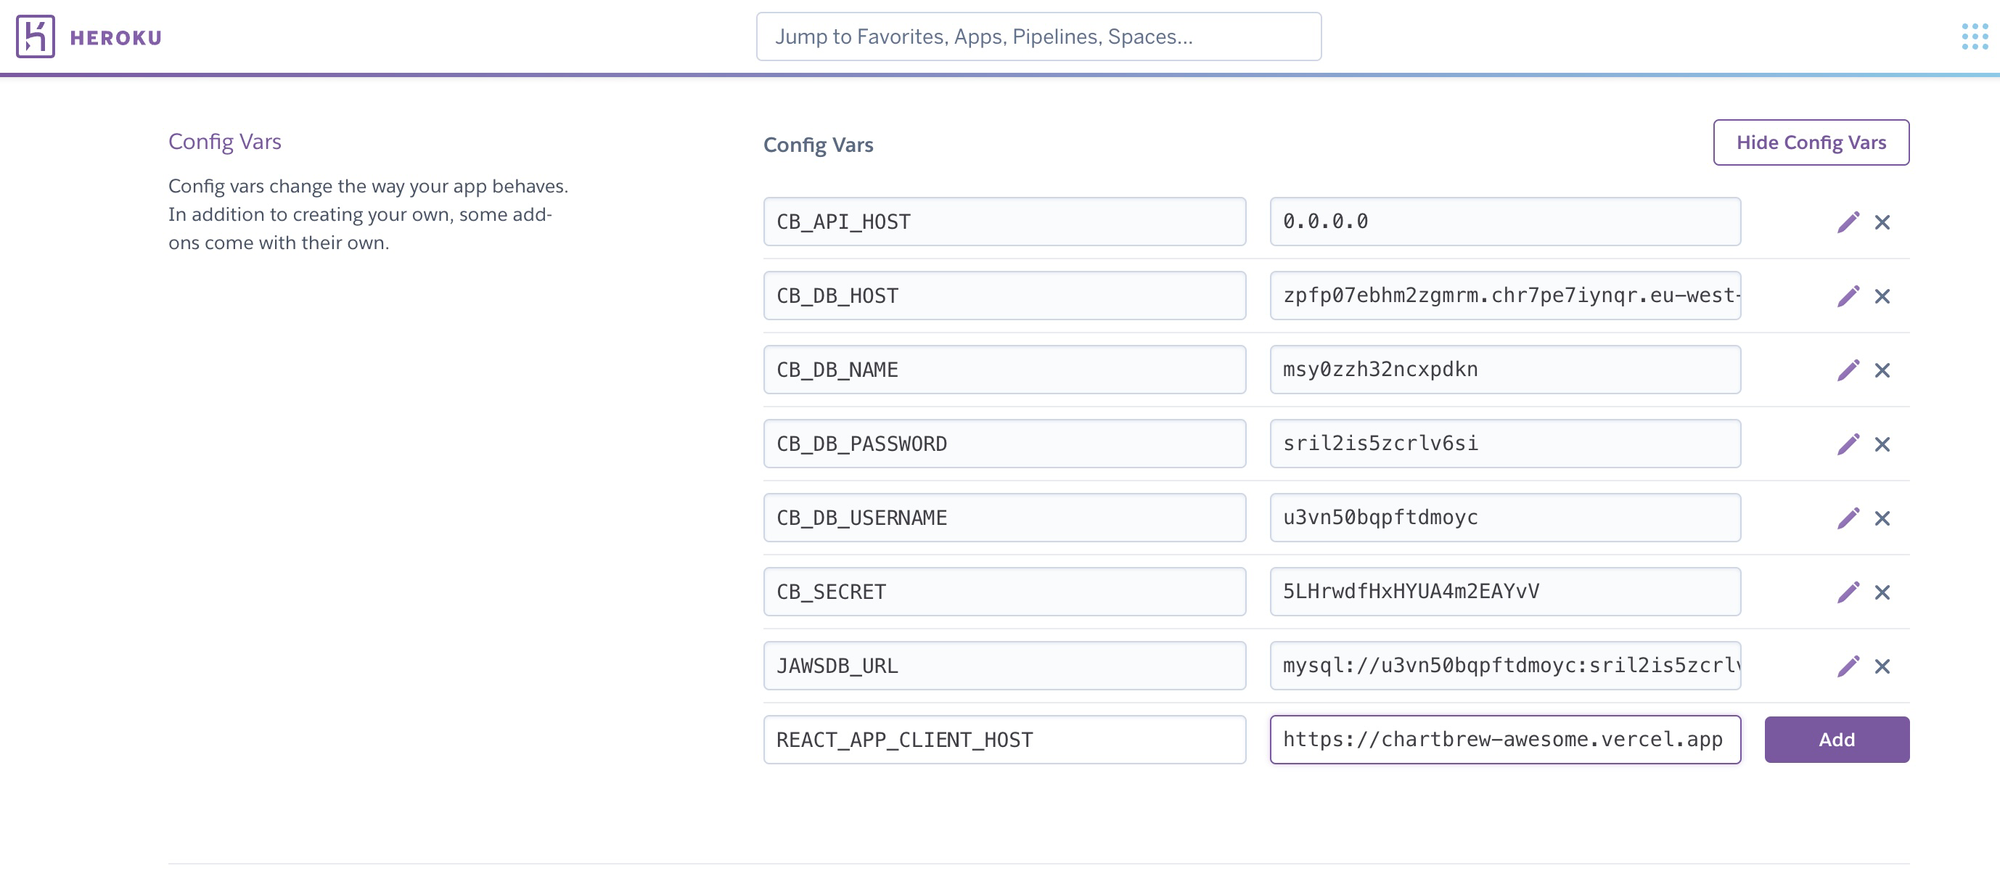
Run the following command to get your database credentials:
heroku config:get JAWSDB_URL

# this command will return a string in the following format:
# mysql://<username>:<password>@<host>:3306/<database_name>
Using the details in the database string returned above, complete the variables as shown in the screenshot (also refer to the list below).
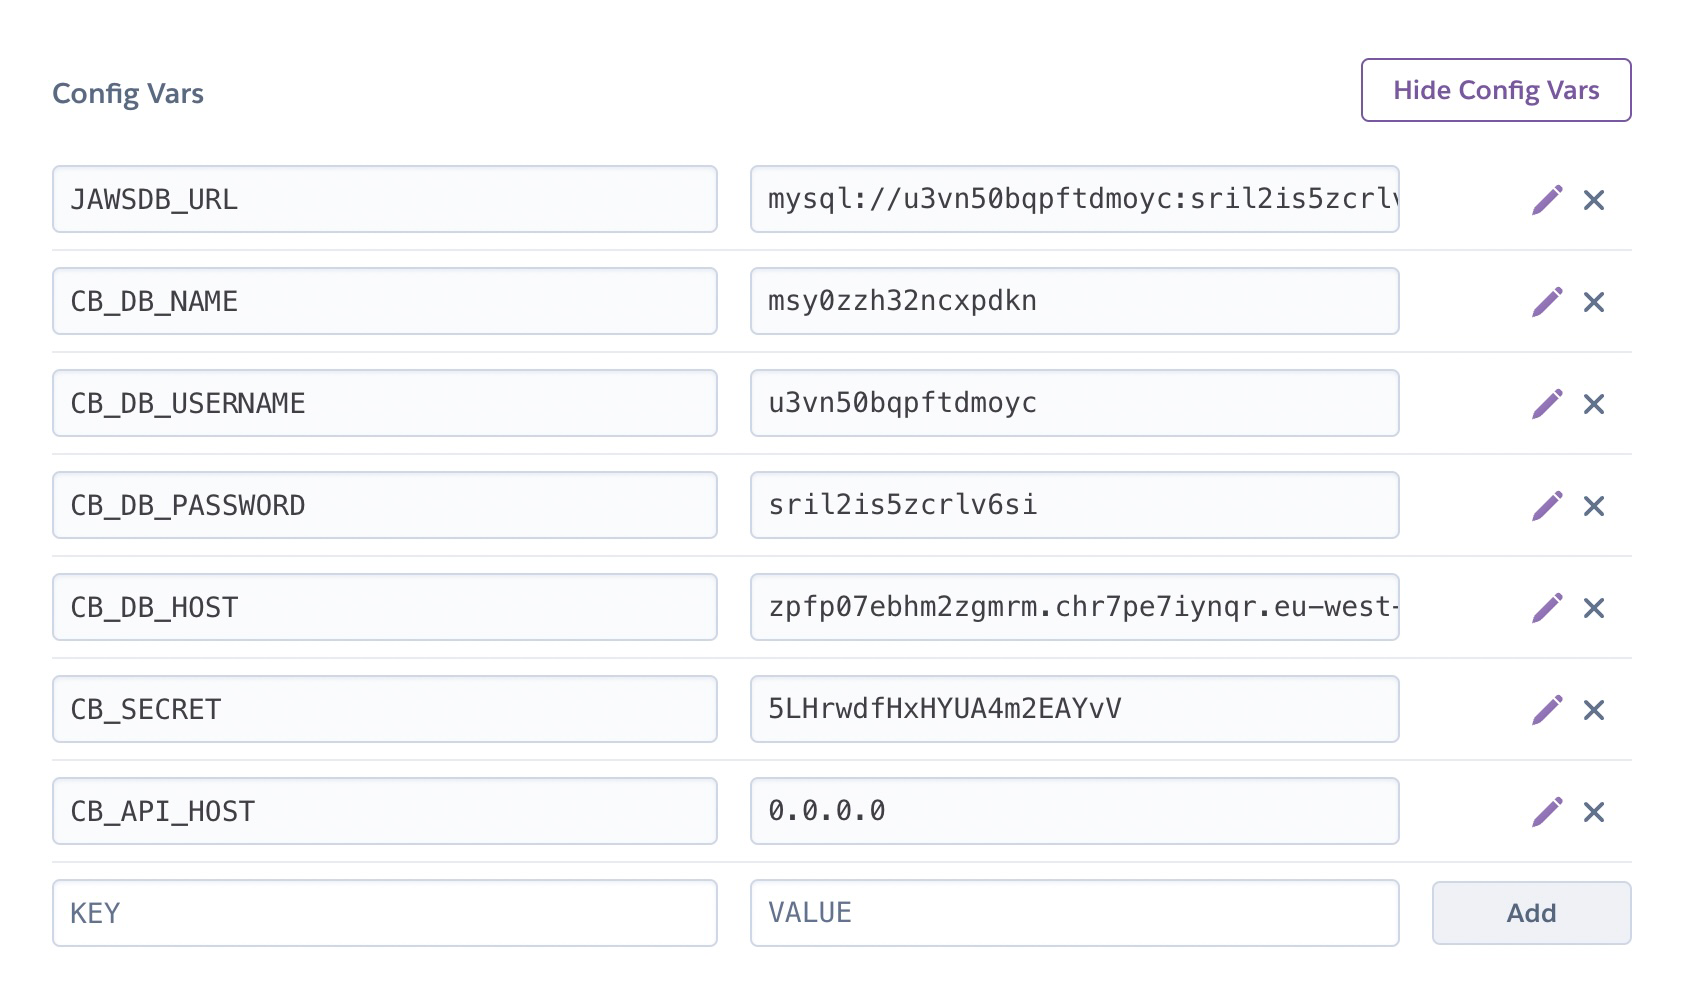
All the required variables for Chartbrew's backend
The required variables are:
- CB_DB_NAME - last part after the "/" in the JAWSDB_URL string
- CB_DB_USERNAME - the username part of the JAWSDB_URL string
- CB_DB_PASSWORD - the password part of the JAWSDB_URL string
- CB_DB_HOST - the host part of the JAWSDB_URL string
- CB_SECRET - a secure string used to encrypt the data in the database
- CB_API_HOST - set this to 0.0.0.0 like in the example
Pushing the application to Heroku
Now we are ready to push the backend app to Heroku and wait for it to launch. To do this, run the following command in the root directory of the cloned project:
git subtree push --prefix server heroku master
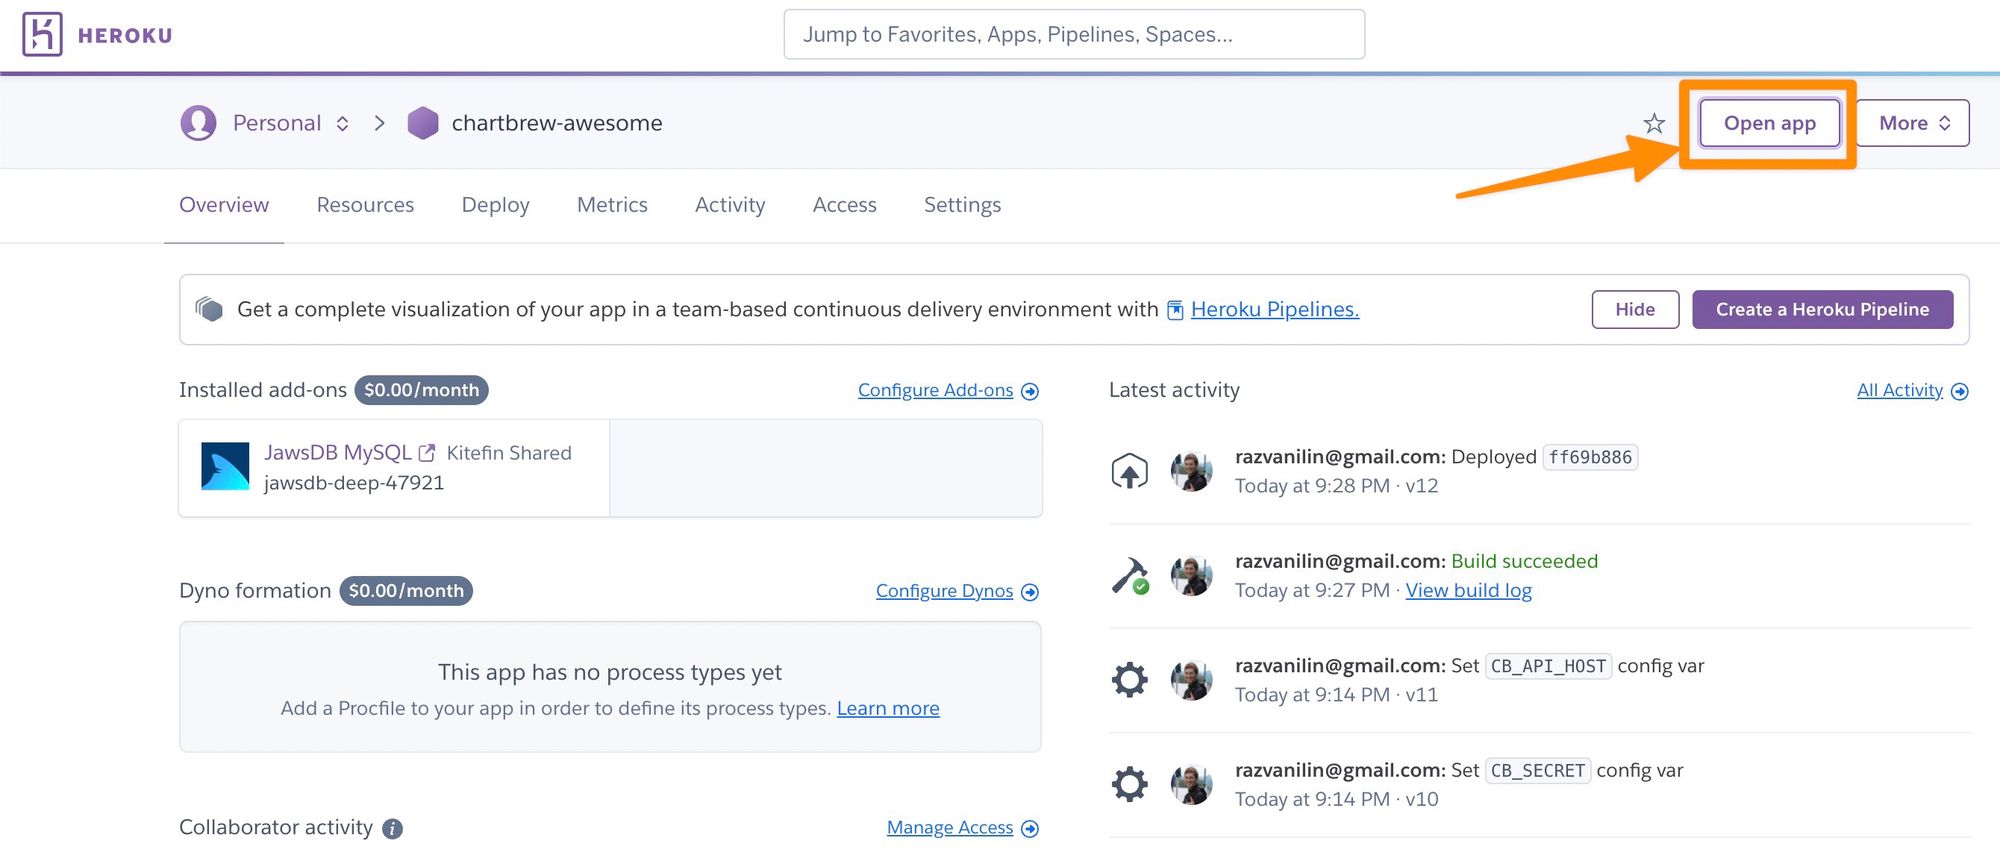
This command will trigger Heroku to build the application. When this is done, you can open the app in the browser.
If everything worked, you should see the following message on a blank page:
Welcome to chartBrew server API
If you see the Heroku error page, it is most likely because some of the variables are incorrect. Make sure the host is set to 0.0.0.0 and the database variables are copied correctly from the JAWSDB_URL string:
# JAWSDB_URL string format
mysql://<CB_DB_USERNAME>:<CB_DB_PASSWORD>@<CB_DB_HOST>:3306/<CB_DB_NAME>
Setting up the front end on Vercel
We have the backend running, so let's get the front end up as well!
Head over to Vercel and create a new project that we are going to use for Chartbrew. On the new project page, we can import the forked project we created on GitHub. If you can't see the project in that list, you might have to adjust the permissions on your GitHub account to give Vercel access to the fork.
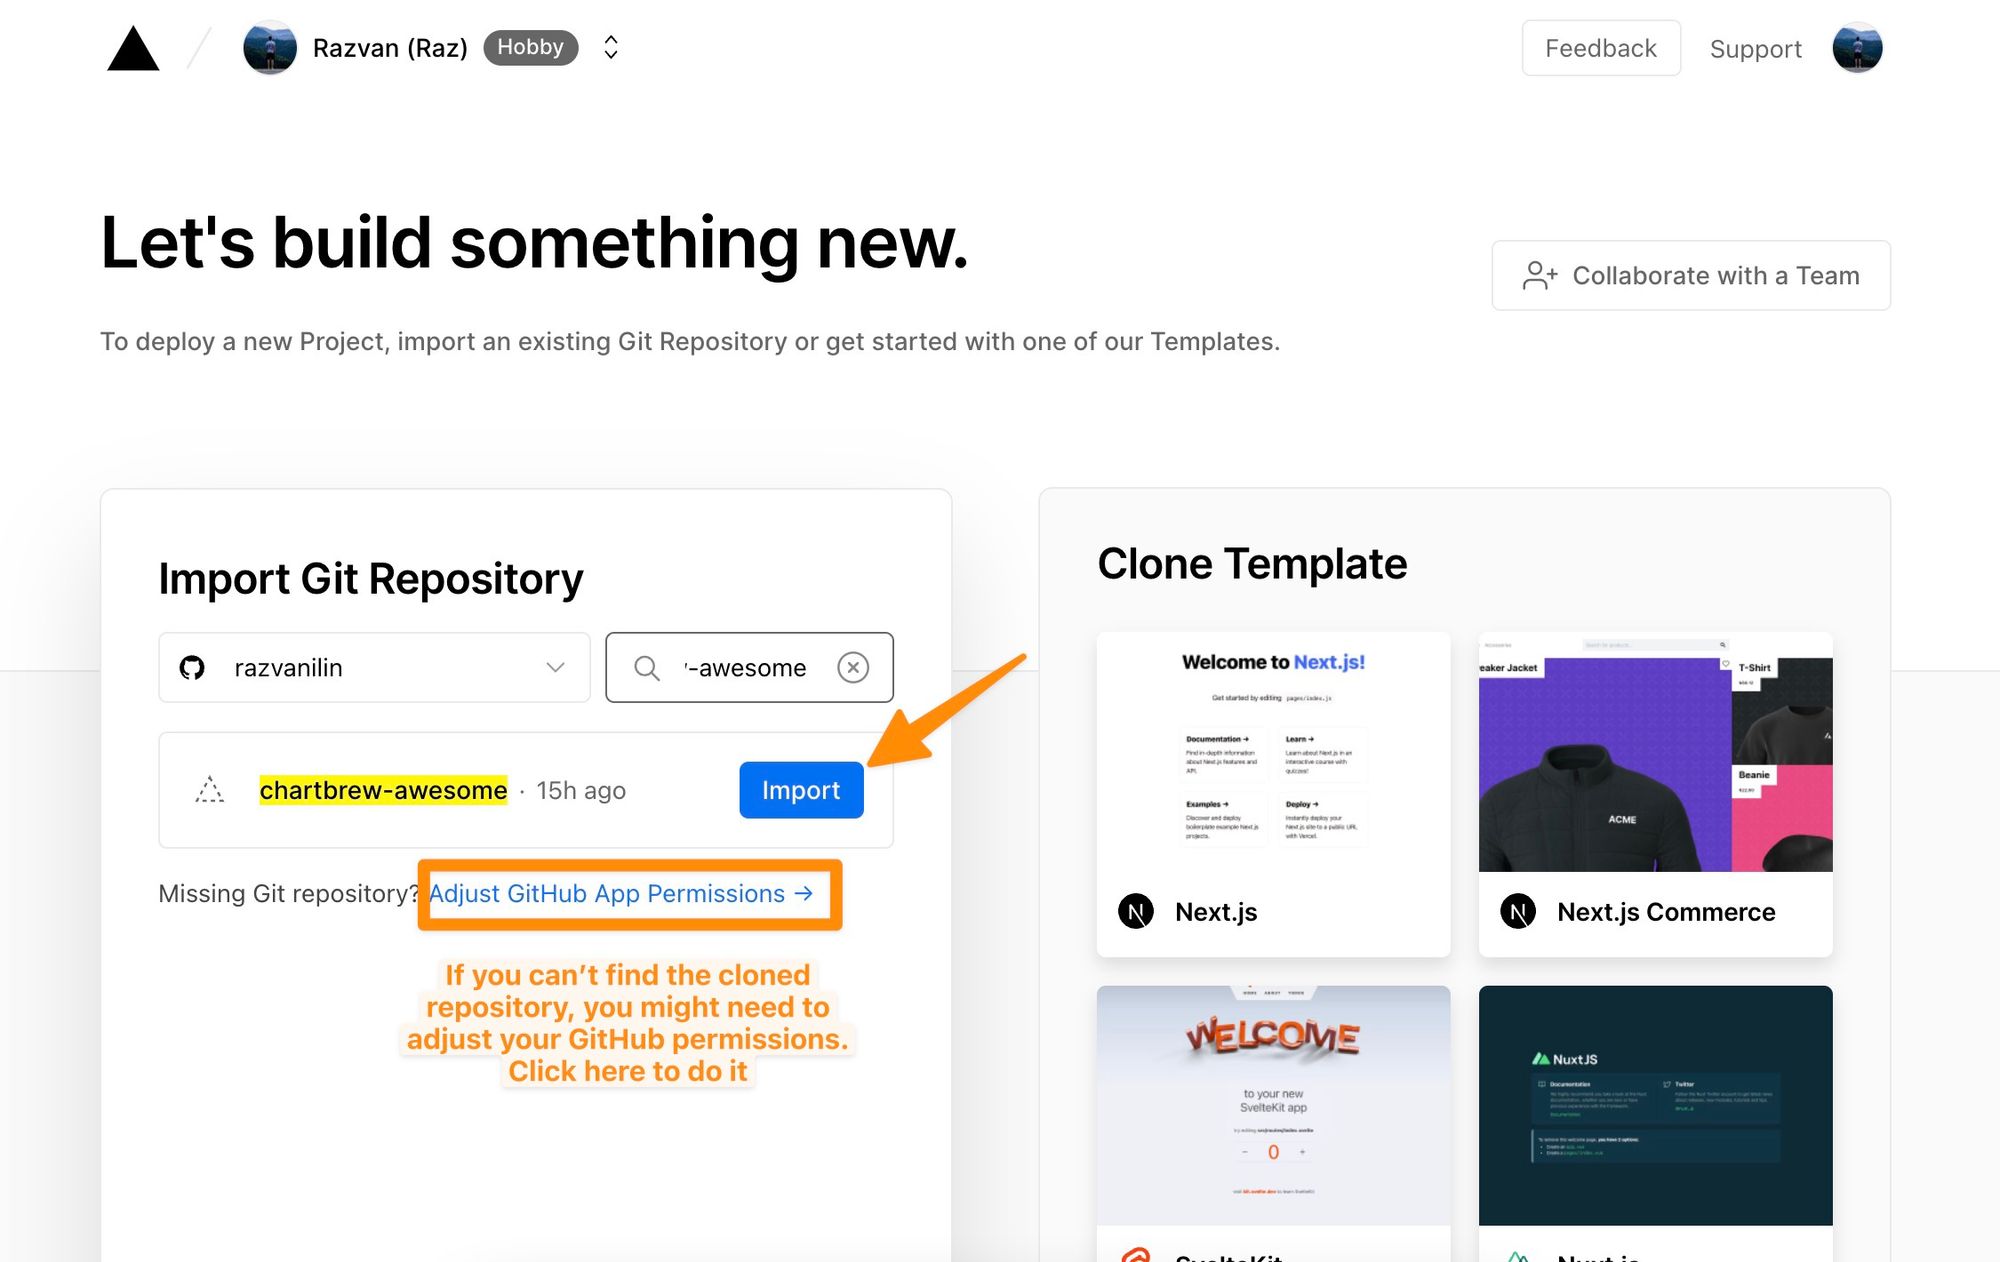
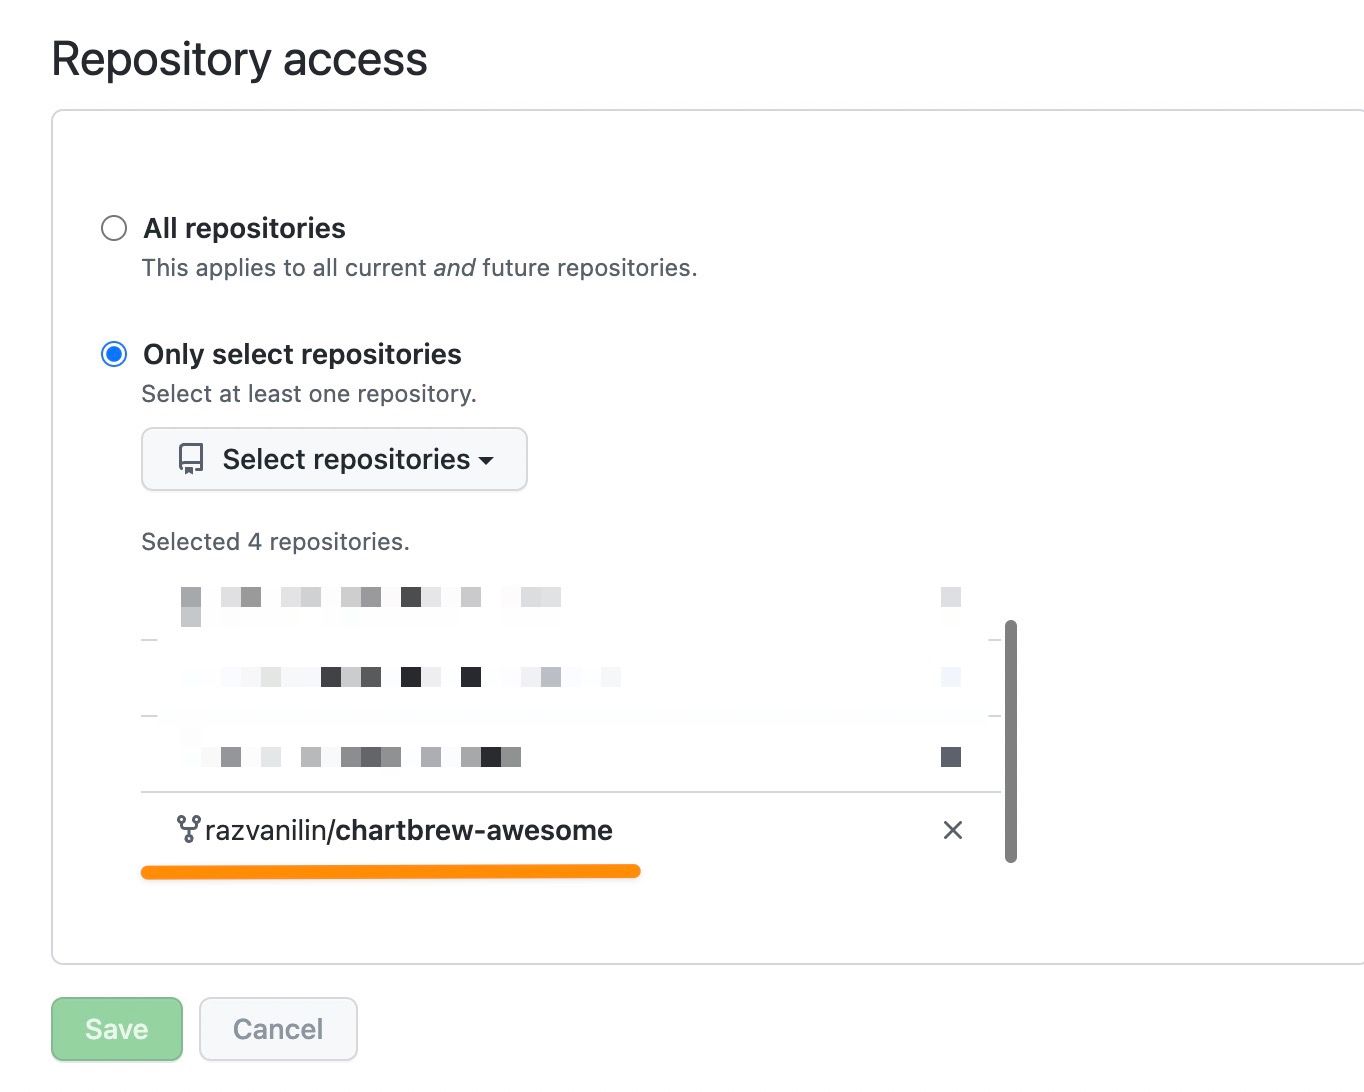
Adjusting the permissions to give Vercel access to the forked project on GitHub
When you can find the project on Vercel and click on the "Import" button, you will be presented with the screen to configure your deployment. We have to do a few adjustments here to make sure the app is working correctly.
- Change the framework preset to "Create React App"
- Edit the root directory and select "client" from the list
- Add the REACT_APP_API_HOST environmental variable. The value needs to be the URL of the Heroku app we set up earlier.
🙋
Example:
REACT_APP_API_HOST=
https://chartbrew-awesome.herokuapp.com
Make sure the URL doesn't have a trailing "/" at the end.
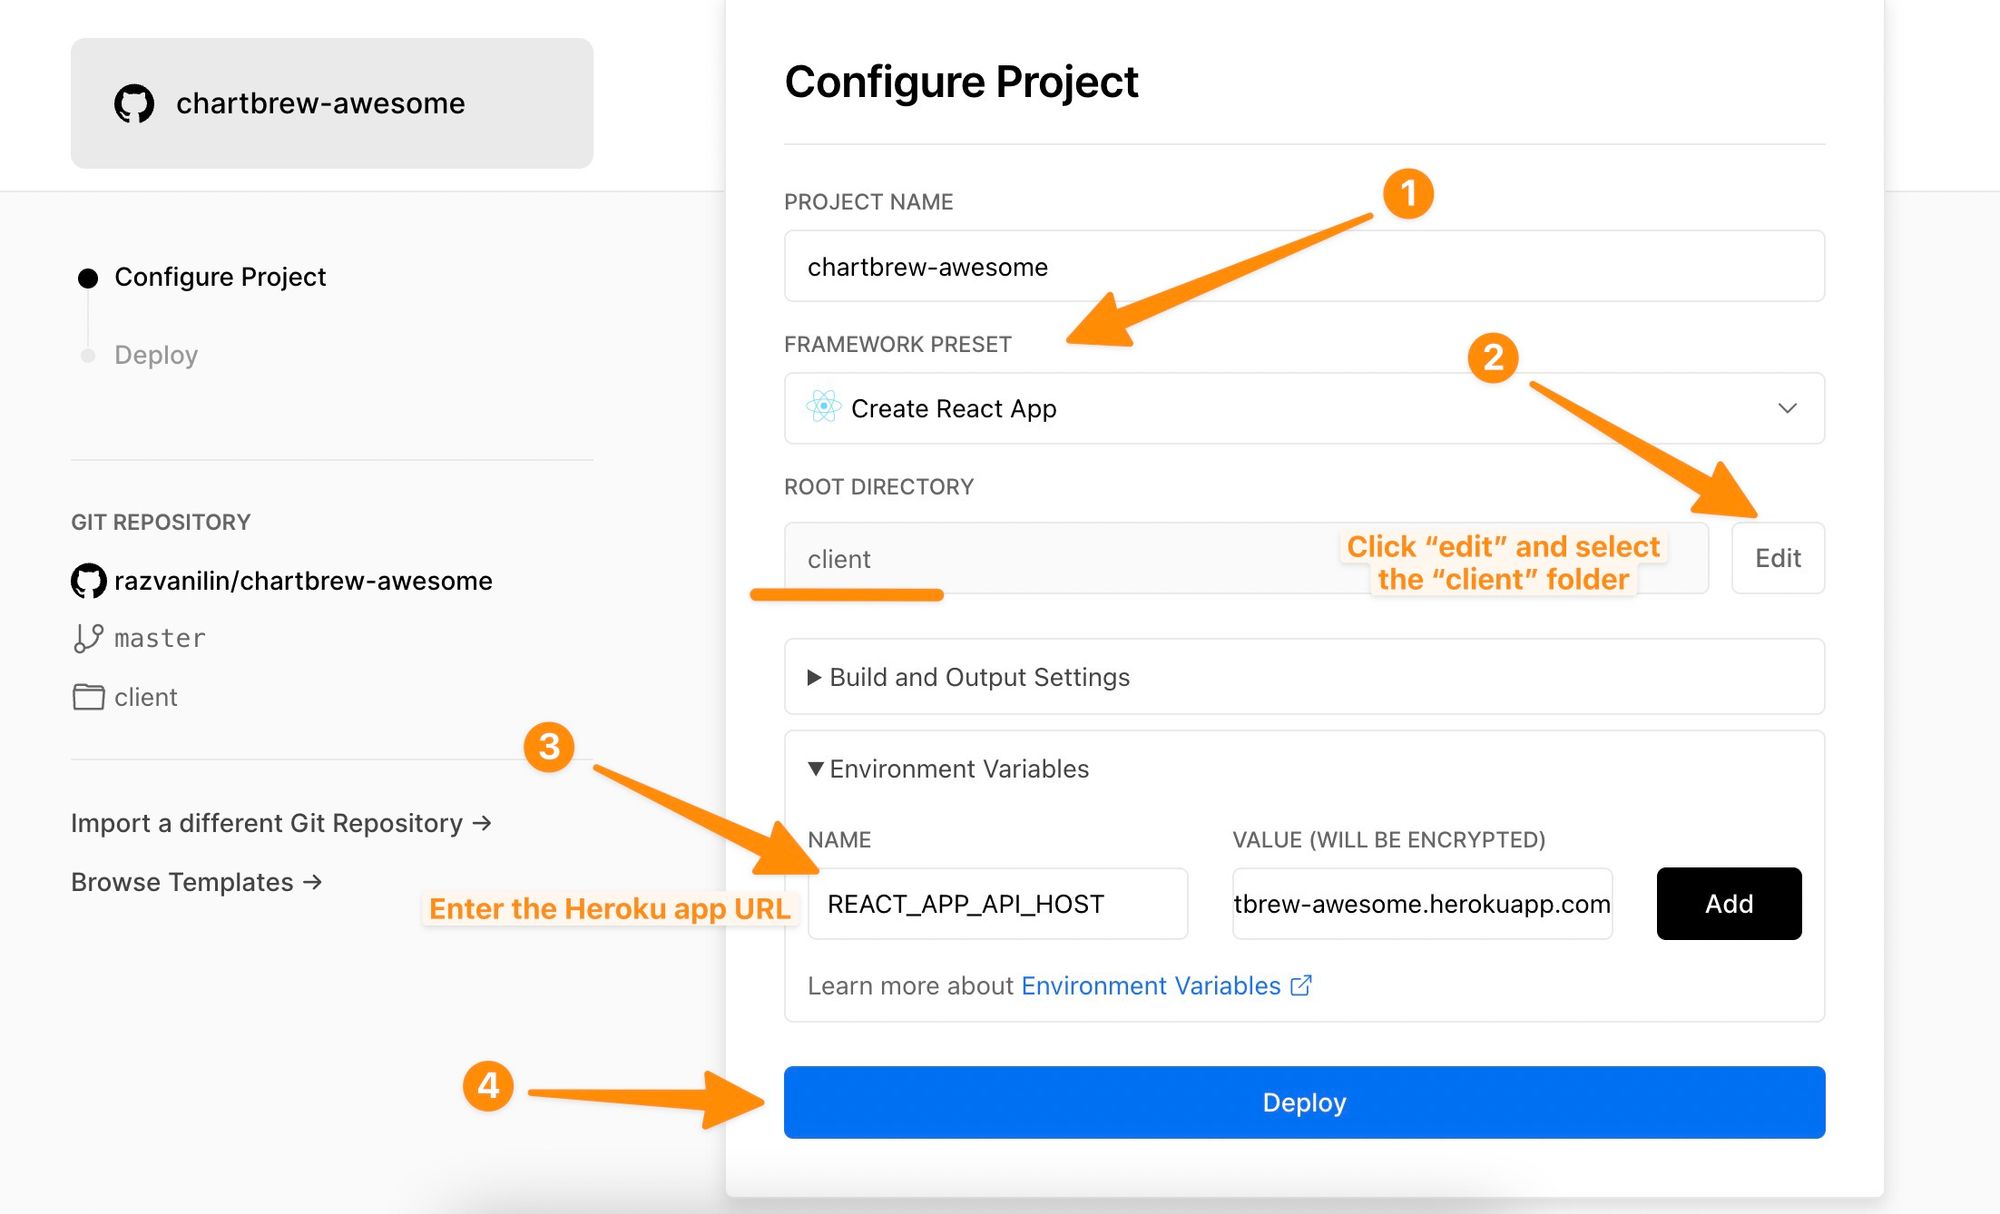
After you click on the deploy button, the application will build on Vercel. This process usually takes a couple of minutes, the perfect time to stretch the muscles a little!
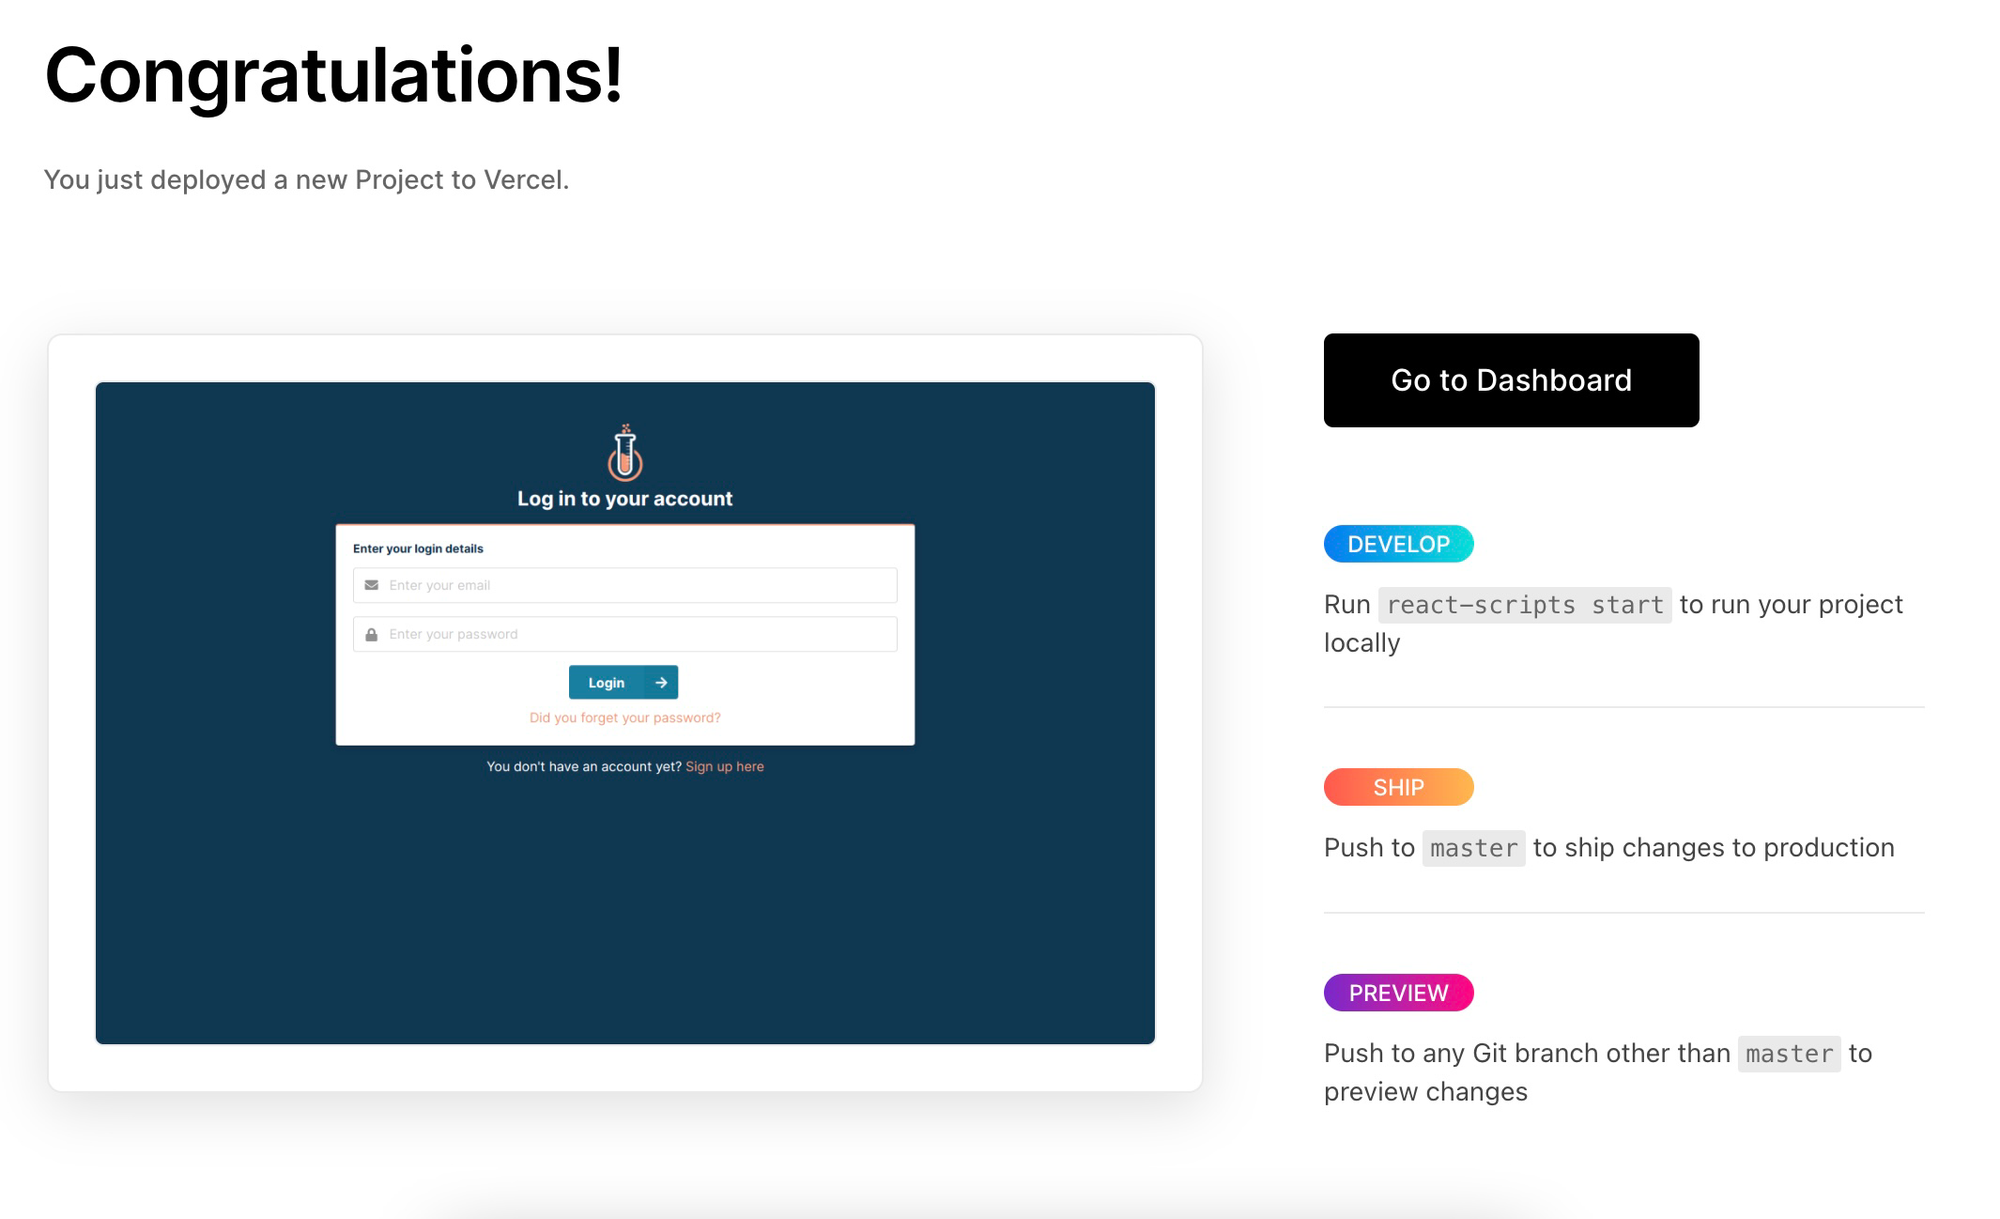
After the deployment process is completed, you will see a success screen with a screenshot of Chartbrew's login page. Click on the picture to open the app in a new tab. Since this is the first time running the Chartbrew instance, you will need to click on the signup link to create a new account, then you are ready to use Chartbrew and its full feature set.
Final touches
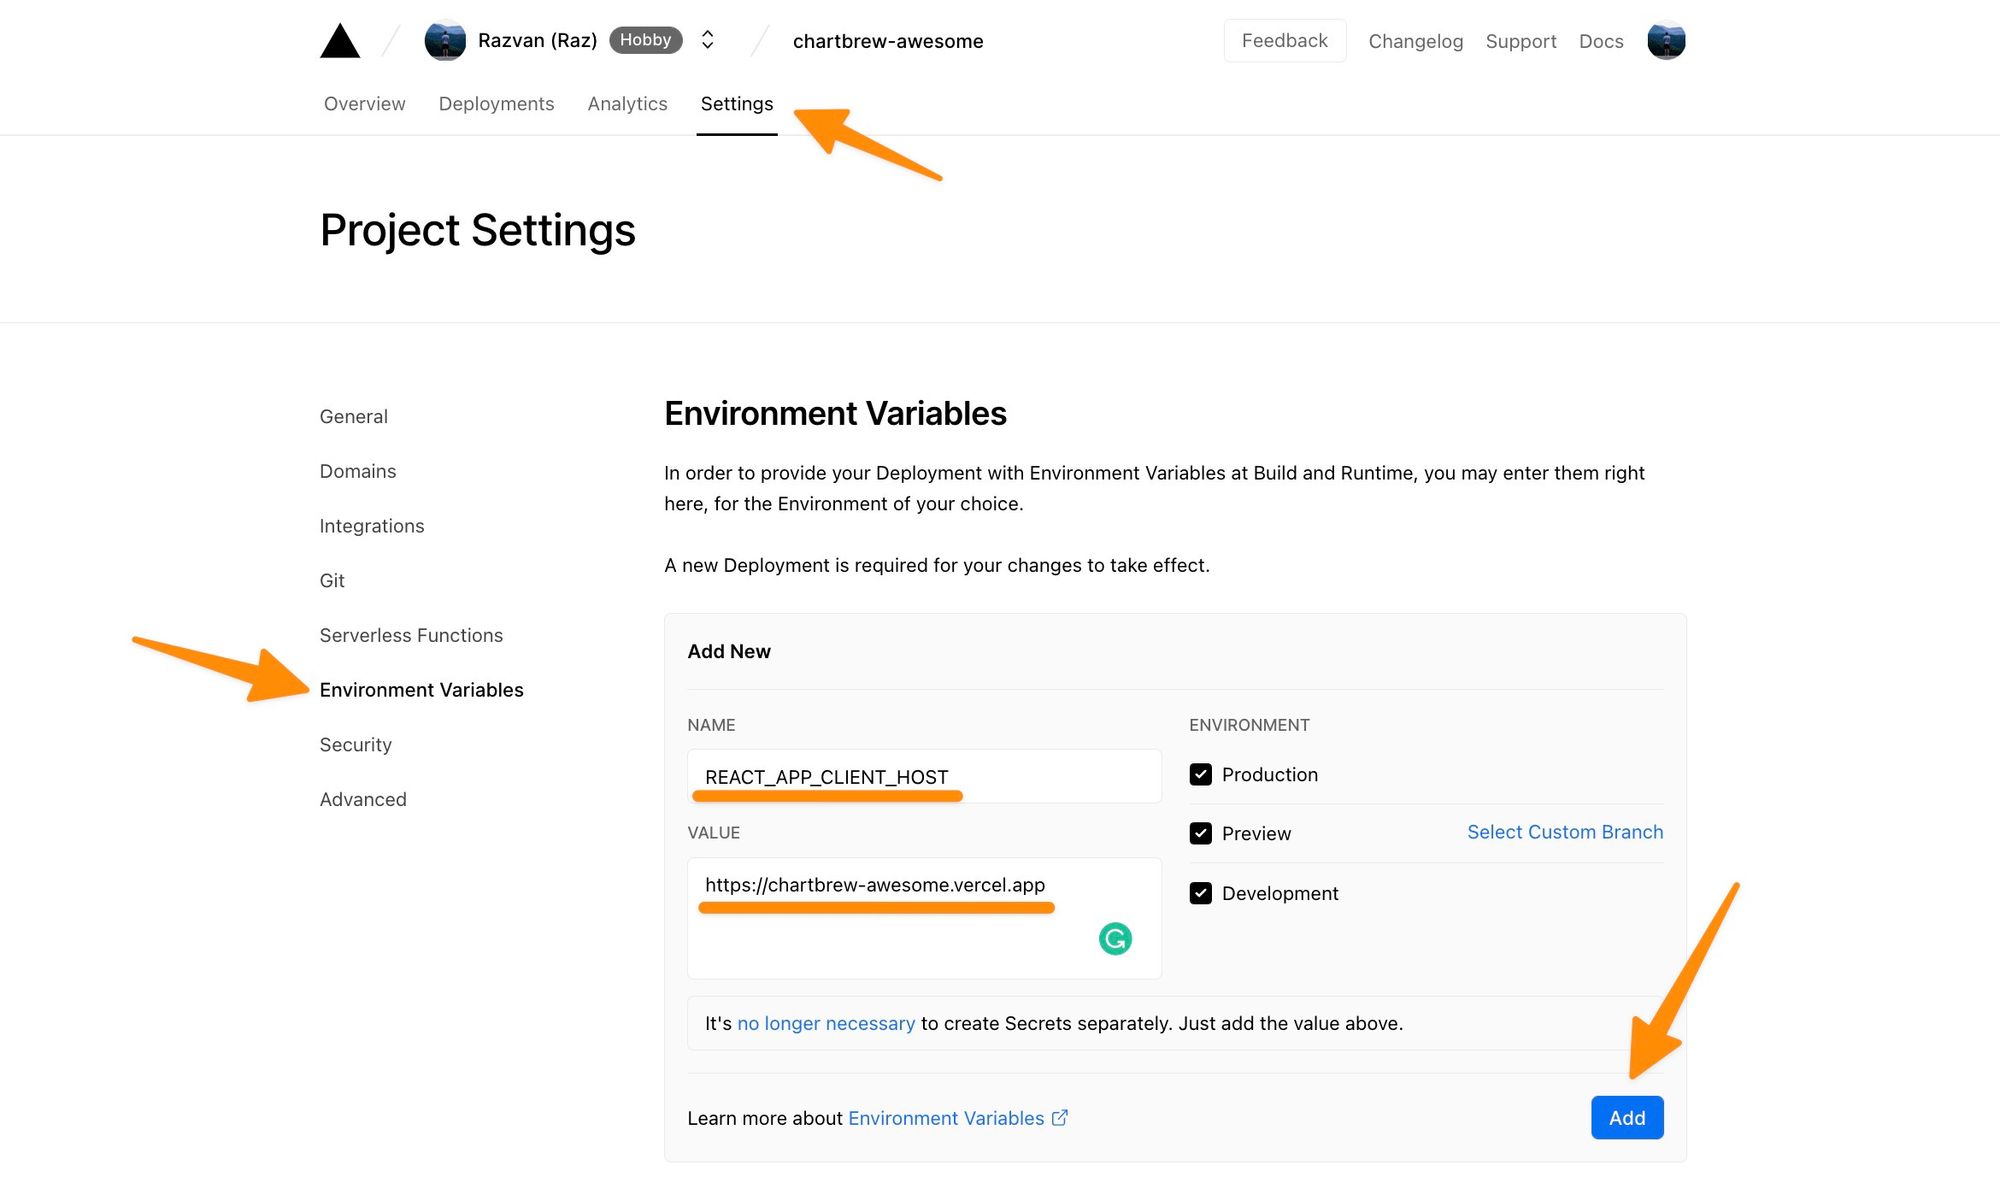
Some features in Chartbrew require the backend and front end to know about the URL of the app on Vercel. Open the app and copy the main URL (e.g. https://chartbrew-awesome.vercel.app) without the trailing "/" at the end.
Next, we are going to add the REACT_APP_CLIENT_HOST variable to both Vercel and Heroku. On Vercel, navigate to the project settings where you will see the option to modify the environment variables.
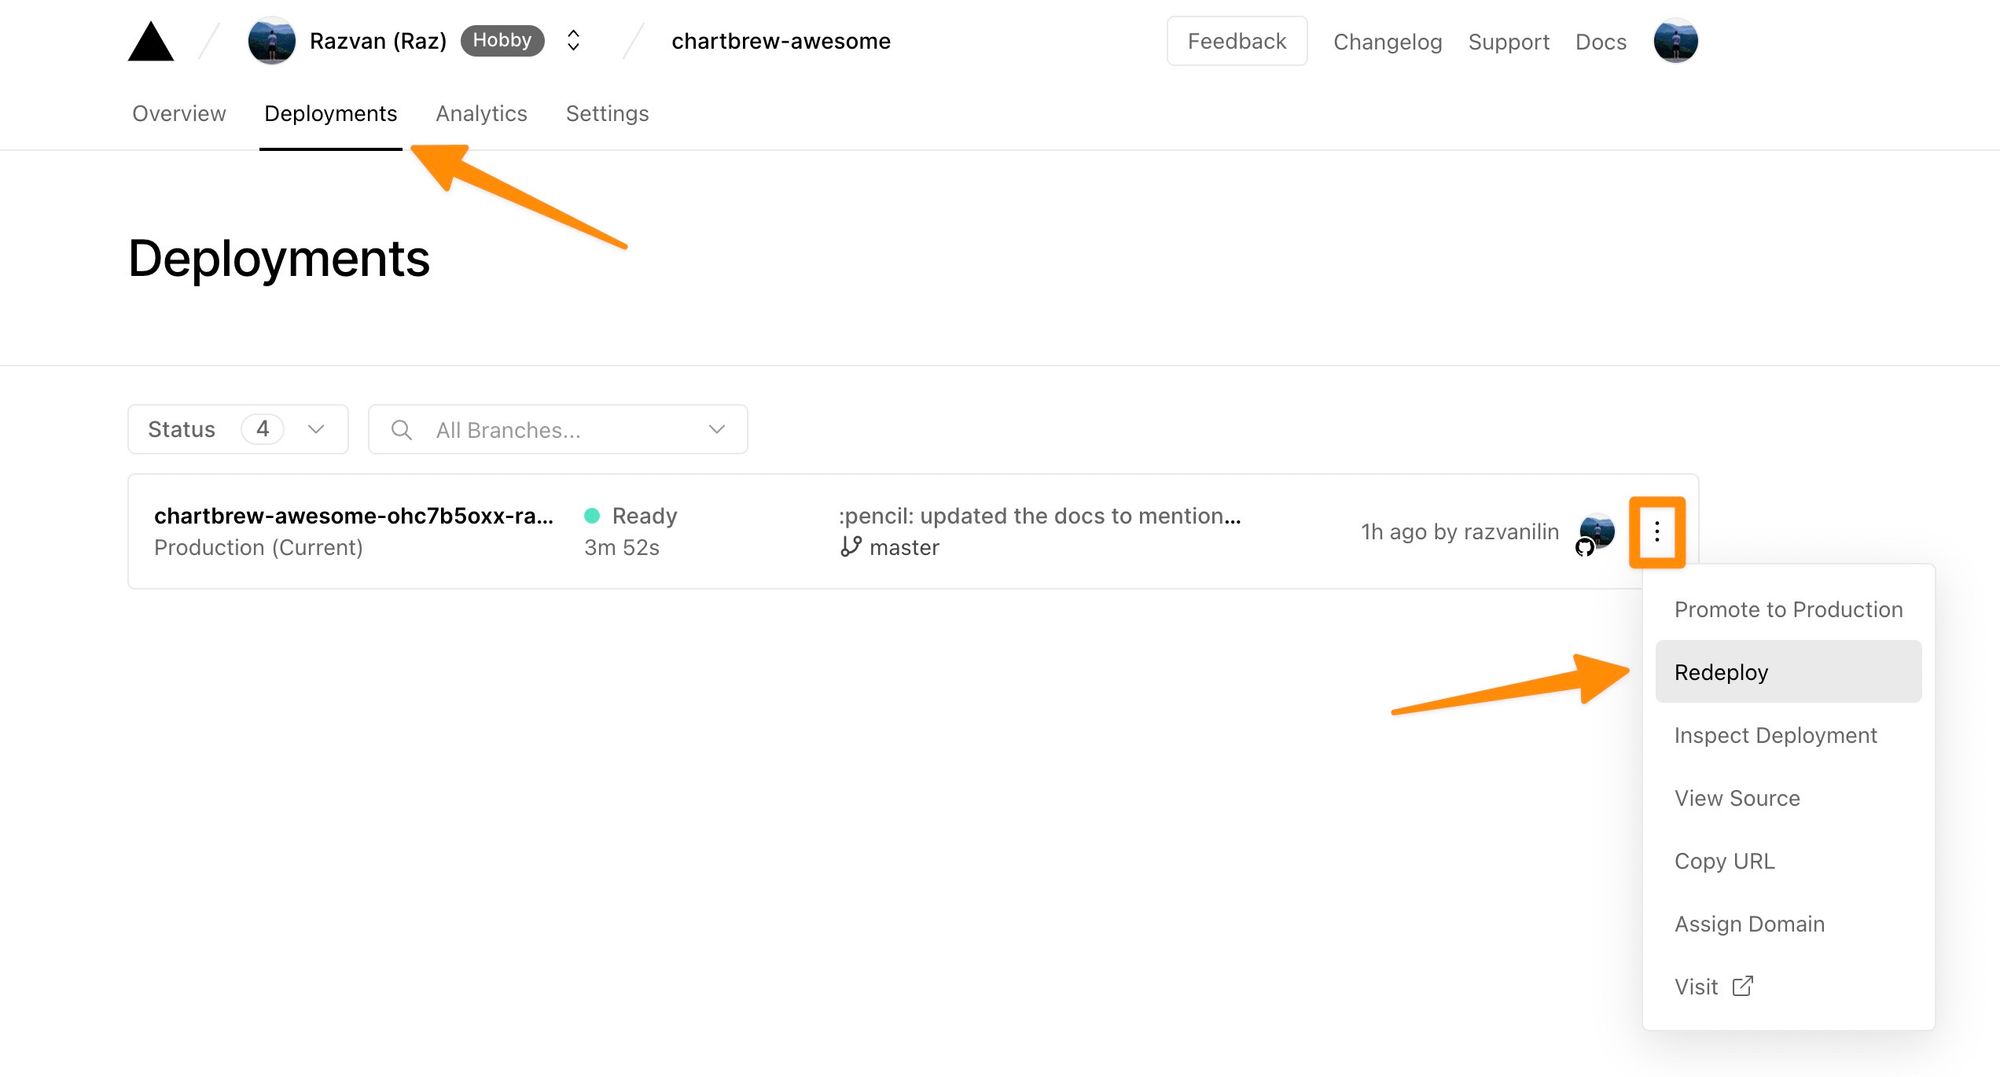
We will then need to redeploy the app so the changes take effect. This can be done from the "deployments" tab like shown in the picture below:
On Heroku, navigate to the project settings and add a new variable as we did in the beginning. Heroku automatically restarts the dyno after the variables are changed, so no need to manually restart it.
And now we have a fully operational Chartbrew instance!
Next steps
Chartbrew has lots of integrations with different APIs and services. If it's the first time you are using Chartbrew, I recommend checking the full list of tutorials to find a guide for your data source.
If you require any help to get started and/or want to chat with existing Chartbrew users, we have a Discord server that is open to everyone. Feel free to join below:
Join the Chartbrew ☕ Discord Server!
Check out the Chartbrew ☕ community on Discord - hang out with 186 other members and enjoy free voice and text chat.
Discord
